SX-SAB Overview
The so-called SX-SAB module for Setting, Acquisition, Batch gives the user the ability to set, acquire and launch automatically WDS spectra, images and profiles, calibrations and quantifications.
How to access to SX-SAB
As for other PeakSight 6.2 main windows, SX-SAB can be opened from the SX-AppBar under the Analysis module or from its corresponding source file under the following folder:
C:\Program Files (x86)\Cameca SX\bin\SXSAB.exe
The SX Analysis module can also be quickly accessed through the wrench-and-hammer shortcut icon located on the Windows® Taskbar.
The three main sections in the SX Analysis module are Settings, Analysis and Batch, leading to the SxSAB designation of the corresponding window. Users will define the appropriate parameters in the Settings window based on the fundamental physics applied to their specific materials.
Parameters will differ whether analysts have to run steels or oxides. Obvious examples concern the X-ray lines selection which will only be available above a specific voltage threshold for instance, or the counting times required for peak and background based on the elemental concentration in a matrix.
The following sections will detail the various options given to the users to create the settings files, run the acquisition files and chain some of these acquisition sequences in a batch.
The SxSAB Window Organization
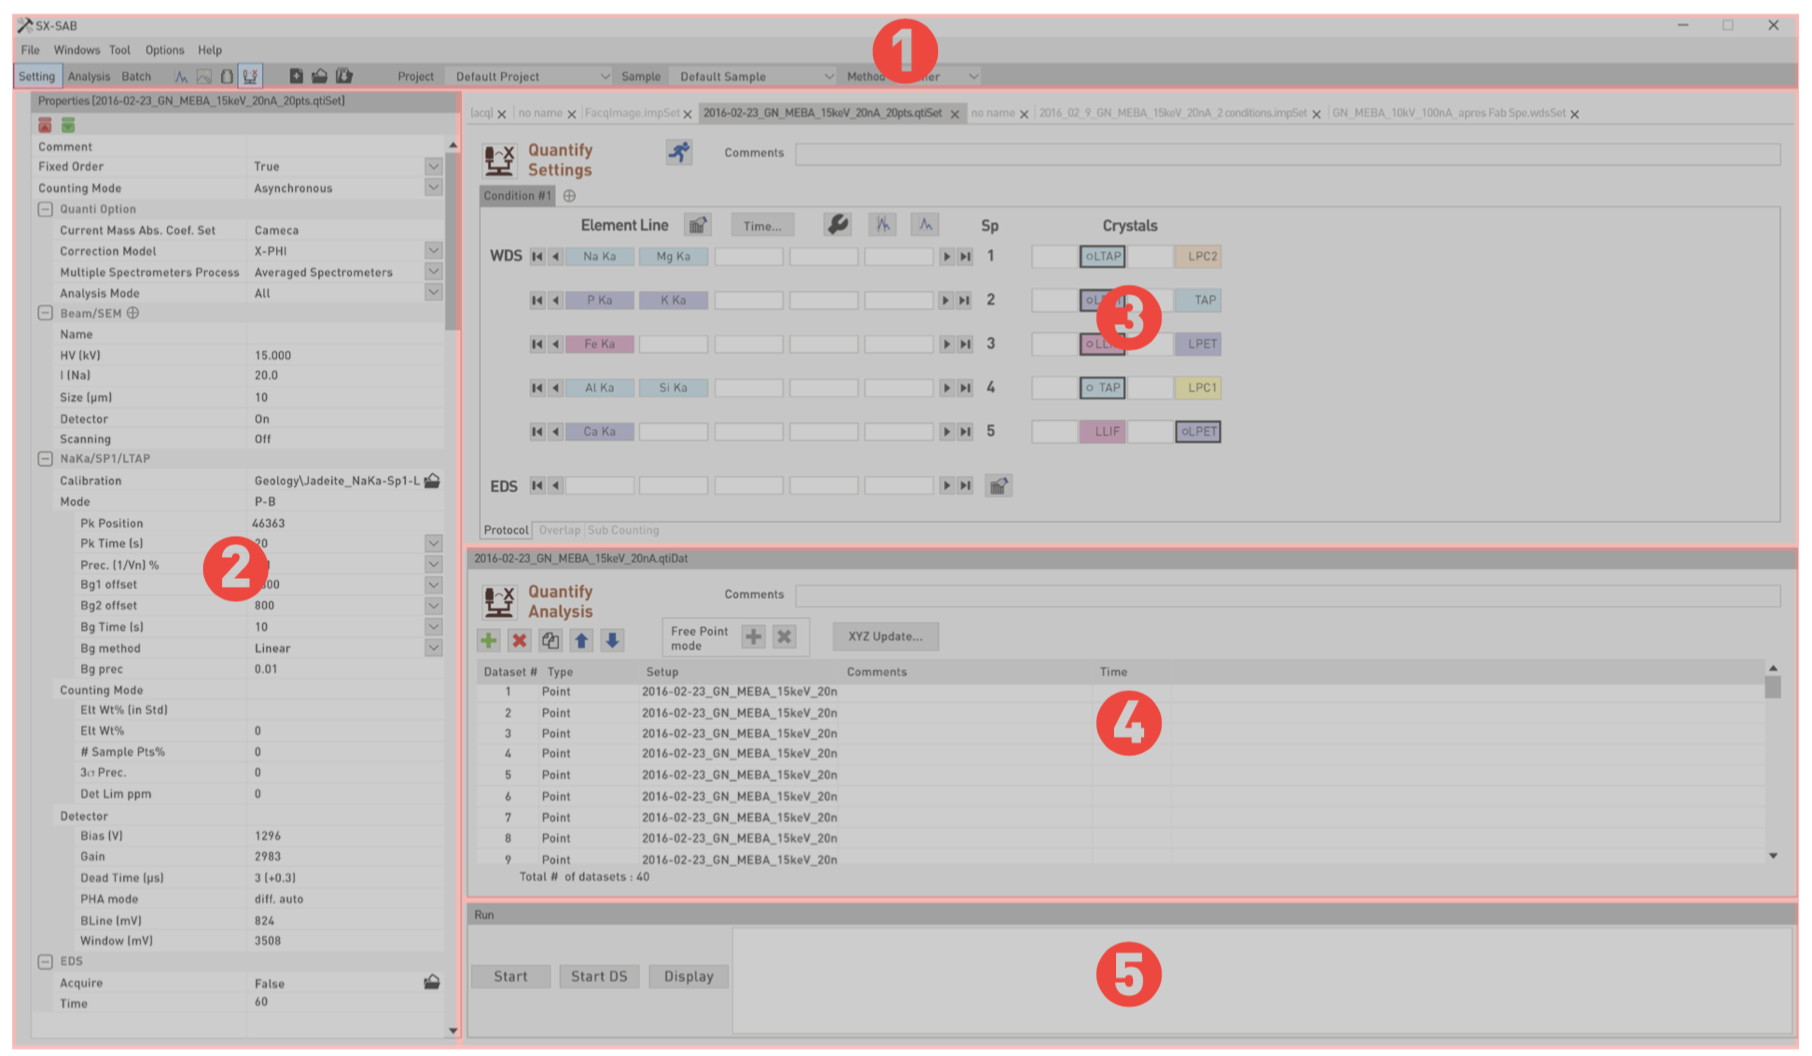
The SX-SAB window is divided into five parts as follows:
1. Menu, shortcuts, and project bar
2. Properties
3. Setting
4. Analysis or Batch
5. Run and machine status
Menu, shortcuts and project bar
The first general menu in the Sx-SAB window possesses five tabs, such as File, Window, Tool, Options and Help. Some functions can be quickly accessed through their corresponding shortcut icons. The user can define specific projects, samples and methods for each analytical session. All settings, analysis and batch files will be located under the C:\SXPC folder.
‘File’ Menu
New
Users have the opportunity to create new files in any of the Settings or the Analysis sub-menus, whether they pertain to WDS spectra, Images & Profiles, Calibrate and/or Quantification.
Open
Users have the opportunity to open existing files in any of the Settings or the Analysis sub-menus, whether they pertain to WDS spectra, Images & Profiles, Calibrate and/or Quantification.
In both case, the Batch sub-menu will not have these options as its purpose is to gather already created settings and analysis files in a desired order to optimize the acquisition throughput.
Close
One can also close a current file via the file menu or type Ctrl+F4.
Import XYZPOS…
In certain instances, it is helpful to define a special routine where a data table containing stage positions is linked to quantification setting files or « .qtiSet » files and to quantification analysis files or « .qtiDat » files. This is achieved by clicking on the ‘Import XYZPOS…’ function from the following location:
\SXPC\XYZ
Save
Once a file is created, it can be saved under an automatically assigned name by clicking on the ‘Save’ option or by applying the Ctrl+S shortcut.
Save As
Allows to edit a specific name to save a current file.
Recent
Lists the last few setting and analysis opened files that can be recalled by looking into the ‘Recent’ submenu.
‘Window’ Menu
All the sub-windows under the Sx-SAB panel can be resized but not displaced from the initial layout fixed in the software.
Reset Layout
Restores the initial arrangement and size of all the sub-windows.
Display Acquisition
If this option is checked, the current acquisition file will run even if the user is building other setting files, and the live data collection can be monitored.
‘Tool’ Menu
Default Options
Accesses the options pertaining to the various settings of the instrument.
With an EPMA system, prior to analyzing samples, calibration steps are required using standards or reference materials. Some of these standards are pure materials and are therefore ideal for a single element calibration. Other references allow users to perform a multi-elemental calibration, provided that all the elements of interest are well accounted for in these standards. In this latter case, a good scientific practice is to check that calibration by probing the standard as an unknown using ‘Std Check’.
Since some elements are sensitive to the effect of electron beam bombardment, it is recommended to perform calibration steps at a new location recorded with ‘Update Std’.
‘Options’ Menu
Command Auto Increment
As users edit analysis locations in an acquisition file, if a number N is placed at the end of a comment, the software will automatically implement the next analysis point with the number N+1, establishing an analysis sequence. When the command is activated a check mark appears in front of the option. Click again to deactivate the ‘Command Auto Increment’.
During long duration analyses, a drift in the electron beam position could occur, inducing measurement errors and uncertainties, especially when dealing with small particles or features of interest. In order to correct for that drift, SEM images are automatically recorded after each analysis point and corrections in the stage positions are implemented based on this feedback. When the command is activated a check mark appears in front of the option. Click again to deactivate the ‘Beam Tracking’.
‘Help’ Menu
The Help Menu indicates the software version currently in use.
Shortcuts Icon Menu
Most of the options described above can also be accessed through several icons as shown below:


To create a new file with the icons, you need to follow a three-step process :
1. Select the desired task Settings, Analysis or Batch. The selected task is highlighted with a blue frame.
2. Select the desired type of data among WDS Spectra, Image & Profile, Calibration or Quantification. The selected type of data is highlighted with a blue frame. When Batch is selected as a task, this step has to be ignored.
3. Selected a file operation such as create a new file, open an existing one or save a current file.
Please follow the examples provided in the Tutorial section (link) for further information about the step-by-step using of the SX-SAB.
Project bar
Users may name their Project and Sample which will be saved in specific directories. They can also define a general ‘Method’ for their analysis such as ‘Geology’, ‘Metallurgy’ or ‘Sulphides’.
SX projects and sample are stored inside:
D:\SXPC\Default Project\Default Sample
Method are stored inside:
C:\Cameca SX Shared\Calibrations\Data\
Related Article
SX-SAB – Setting
Reading Duration 56min
The first main function of the SX-SAB is the ability to create or modify all the hardware and software settings that will rule data acquisition. WDS Spectra, Images & Profiles, Calibrate and Quantification are described below. A tutorial section (link) is available to guide users on defining proper settings and options as applied to specific cases.
SX-SAB – Analysis
Reading Duration 33min
The analysis mode of the SX-SAB gives the users the ability to acquire data according the settings defined previously. WDS Spectra, Images & Profiles, Calibrate and Analysis are described below. The Tutorial section offer more information about step-by-step procedures for some practical cases. The general window organization is the same as in the of SX-SAB Settings mode. The properties panel is dedicated to DataSet #, Dataset # Options, and Common Options.
Contact

Our support team is ready to help you
FAQ

Answers to some common questions from SX users
Troubleshooting

Quickly search for solutions to instrument issues