ETU – Quanti/Check
The ‘Quanti’ panel provides tools for chemical composition analysis of unknown samples. The operator can use a pre-existing analytical protocol, create a new protocol with a known list of elements, or build a protocol without any previous knowledge of the sample composition.
There is also a ‘Check’ tab with tools for validation of the instrument, quantification setups, and calibrations.
Calibration method
Calibrations may be grouped by four different methods. Placing calibrations into groups is mainly a convenience to prevent buildup of a large single list of calibration files. A calibration from any group may be used with any quantification protocol. However, there is one functional difference of the ‘Geology’ method: when creating a Quantitative settings file, oxygen is assumed to be a non-analyzed element whose concentration will be calculated by stoichiometry, based on the concentrations of the measured elements.
- Geology
- Metallurgy
- Sulphide
- Other

Quanti
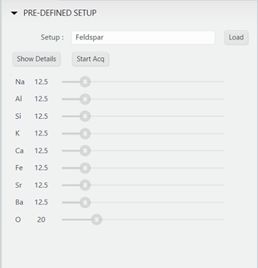
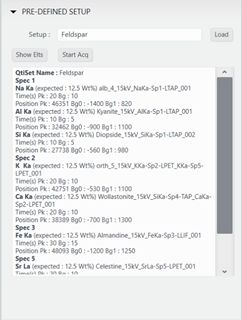
Pre-defined setup
If the quantitative analysis setup is already known, it can be loaded directly with the Load button. The parameters of the acquisition can be viewed by pressing the ‘View Elts’ (elements) or ‘Show Details’ buttons.
The ‘Elements’ display shows the list of elements to be measured or calculated. In the case of a pre-defined setup, the composition sliders cannot be modified.
The ‘Details’ display shows a listing of measurement parameters, such as spectrometer positions, counting times and calibration files, to be used during the quantitative measurement acquisition.
.
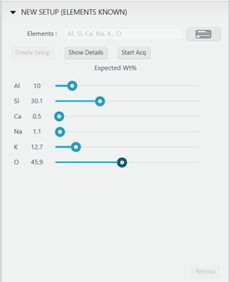
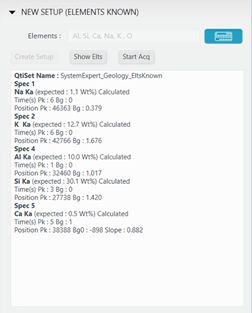
New setup (elements known)
If a protocol for the analytical measurement does not exist, the Expert System 1) can create one with minimal input from the operator. The operator supplies a list of elements to be analyzed, along with an estimate of their concentrations. Use the Periodic Table display to chose the elements and adjust the expected concentrations with the sliders. Press the ‘Create Setup’ button to generate an analytical protocol. If the Calibration Method is set to ‘Geology’, oxygen is added to the element list. Its concentration will be calculated by stoichiometry.
The Expert System searches existing WDS calibrations made at the current beam voltage. The selection of WDS crystals and X-ray lines depends on parameters in the SX ETU configuration. If no existing calibrations are found by the search, a calculated calibration is created. Measurement parameters (counting times, background offsets and slopes, etc.) are calculated to yield an analytical precision based on the expected count rates from the sample and standard. The preset precision is defined in the SX ETU configuration as either 1 σ or 3 σ.
.

1) A CAMECA-exclusive tool, the Expert System requires WDS spectrometer efficiency measurements, normally acquired by a CAMECA engineer at instrument installation or by an expert user
New setup (elements unknown)
If a quantitative analysis protocol does not exist, it is possible to create one without any previous knowledge of the sample composition. The first step is to acquire WDS or EDS X-ray spectra. After the spectra are acquired, automatic element ID creates an element list with an estimated element concentration. From this information, the Expert System creates a quantitative analysis protocol. If the Calibration Method is set to ‘Geology’, oxygen is also added to the list of elements and its concentration will be calculated by stoichiometry.
.

Using an EDS spectrum
- Position the sample under the electron beam.
- Click on the
 button to start an EDS spectrum acquisition
 - At the completion of the acquisition, an automatic element identification routine (AutoID) generates a list of elements and their expected concentrations, in element weight %.
- If desired, edit the element list with the Periodic Table display and adjust the expected concentrations before creating a setup.
- The Create Setup button uses the Expert System to generate an analysis protocol
Using an WDS spectrum
- Position the sample under the electron beam.
- Click on the button to start an EDS spectrum acquisition
- The WDS acquisition uses the WDS settings file designated in the SX ETU configuration. The settings file defines the spectrometers and crystals to be used for the measurements. The currently installed crystals will be changed, if needed, to match those in the settings file. If the any of crystals have not been verified, the stage moves to the stored position of the verify standard, then performs a spectrometer verification and PHA adjustment for the non-verified crystals. After these tests, the stage returns to the sample.
- WDS scans take longer than EDS acquisition and may last up to several minutes.
- After the WDS spectral acquisition, Auto ID returns an element list with an estimate of the sample’s composition.
- If desired, edit the element list with the Periodic Table display and adjust the expected element concentrations before creating a setup.
- The Create Setup button uses the Expert System to generate an analysis protocol.
Acquisition (for all setups)
Once a setup is loaded or created, analysis can begin.
Position the sample under the beam and press on the ‘Start Acq’ button to proceed.
The base name of the Settings file can be changed. This file contains information about the analytical settings, or protocol. The full filename will contain the base name plus the date, time and calibration method.
Likewise, the base name of the Analysis file can be changed. This file contains the analytical data. The full filename will contain the base Analysis Name plus the date, time and calibration method
.
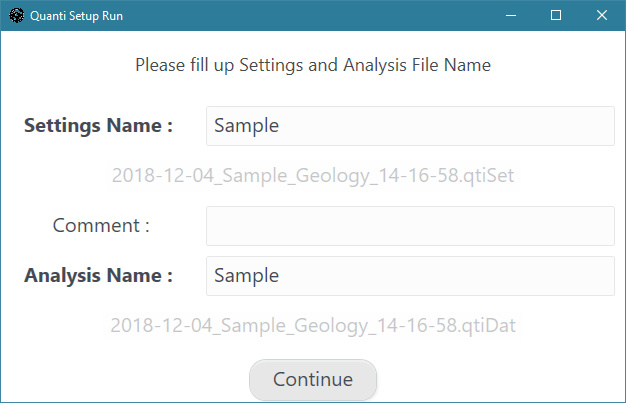
Press ‘Continue’ to begin the analysis.
The analysis progress and results can be monitored in the SxSAB program.
Repeat with ‘Continue’ for additional analyses.
- If the Analysis Name is changed, subsequent data are added to a new data file with a new base name.
- If the Analysis Name is unchanged, subsequent data are added to the existing data file.
- If the Analysis Name is unchanged, but the Settings Name is changed, new data are added to the existing data file. This means that an Analysis data file can contain analyses made by more than one Settings protocol
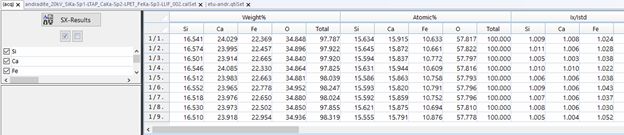
The quantitative data files (Analysis files, or qtiDat files) may be opened in SX-Results for further processing, with the same functionality as quantitative data files acquired in the PeakSight SxSAB program.
Check
Machine Check
This function may be used to verify that the tool is in good working order.
Steps performed during the test:
1. The beam is set using the parameters from a defined beam setup.
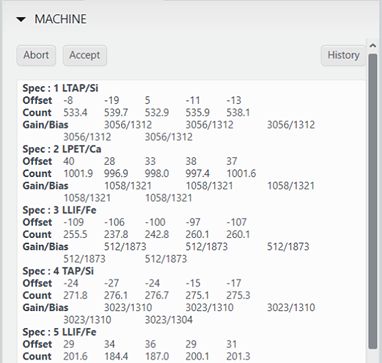
2. The stage is moved to a stored sample location for spectrometer verification (e.g., andradite)2.
3. The spectrometers are verified (Fe, Ca, and Si for LiF, PET and TAP). The dynamic offsets are saved.
4. The ‘Test PHA’ command is issued. If any pulse distribution has shifted more than +/- 0.25V, the ‘Adjust PHA’ routine is issued for the spectrometer/crystal pair with the shift.
5. 20 s long X-ray count measurements are taken at three sample locations, 5 m apart.
6. The user is presented with the results and must press ‘Accept’ to proceed to any other function in SX ETU.
7. After pressing ‘Accept’, the column parameters return to their pre-test conditions.
8. New dynamic offsets and detector gains/biases are also recorded in the Logbook.
The ‘History’ button shows up to the last five tests.
The WDS spectra from the verify command are saved in the Logbook\MachineCheck folder as wdsDat files.
The PHA distributions from the PHA adjust command are saved in the same folder as profile data (impDat files).
The test parameters are stored in SX ETU Configuration and are set up by the Expert operator of the SX.
QUANTI Check
The Quanti Check function may be used to validate a quantitative analysis protocol.
For each Calibration Method (Geology, Metallurgy, Sulphide and Other), a quantitative settings file and a representative standard sample are defined in the SX ETU Configuration. During the Quanti test, this sample is analyzed with the predefined setup. The results are compared to the expected concentrations. A pass/fail result is presented, which is dependent on the error specification defined in the SX ETU Configuration
Start button
By clicking on Start, the WDS crystals necessary to carry out the first series of measurements are installed.
The stage moves to the stored position for spectrometer verification and a spectrometer verification (wavelength calibration) is performed. For this check, the beam setup is the same as that used for the Machine Check function.
After the verification is complete, the column returns to the beam conditions in the quantitative settings file and the stage moves to the representative sample for the current Calibraton Method.
The Run button changes to Continue. The operator can reposition the sample to a better location, if desired.
Pressing Continue starts the measurements.

A stage Z-Autofocus is performed.
Individual analyses are acquired on a 3x3 grid with a 10 μm spacing between each point.
The in-progress analyses can be viewed in the SxSAB program.
At the end of the acquisition, a table is presented to the user, showing either a Pass (‘OK’) or Fail (‘NOk’) for each element. In the example shown here, the error specification is 0.2 wt. %.

Accept button
The user can accept the measurements and the measured variations without re-calibrating.
After pressing the Accept button, the column is returned to pre-test conditions (HV, beam current, etc.).
Restandardize button
By clicking on the Restandardize button, the program recalibrates all elements.
- The stage moves to the standard of the first element to be recalibrated.
- The user adjusts the position of the point, then clicks Continue to update the position.
- The stage moves to the next standard.
- After the position of the last standard is updated, the calibration measurements begin.
- The calibration measurements are made on three points.
- A new calibration file is created at the end of the measurements.
- The old calibration file is automatically moved to a Backup subdirectory within the selected Calibration Mode directory.
- Quanti setups of the same mode (Metallurgy, Geology, Sulphide or Other) are updated automatically with the new calibration data.
History button
The History button shows the results of previous Quanti checks.
STANDARD Check
The Standard Check function may be used to check the validity of a calibration.
Opening the Standard Check tab populates a list of calibrations for the selected Calibration Method (it may be necessary to cycle through Methods to refresh the list). Only calibrations at the current beam HV are shown and only the most recent calibration for a particular element/X-ray line/spectrometer/crystal/sample is shown.
The list can be sorted by clicking on column name.
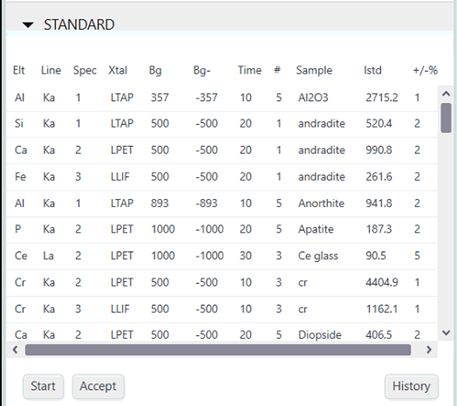
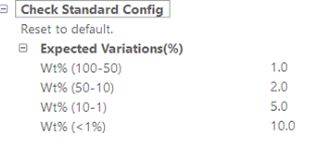
The ‘+/-%’ column indicates the acceptable % variation during the test. The values are dependent on sample composition and are saved in the SX ETU configuration. Default values are shown below:
To validate a calibration, select a line in the Standard list (multi-line selection is also possible).
- By clicking on Start, the WDS crystals are installed to carry out the first series of measurements.
- The stage moves to the stored position for spectrometer verification and a spectrometer verification (wavelength calibration) is performed.
- After the verification is complete, the column returns to the beam conditions in the calibration file and the stage moves to the calibration standard.
- The Run button changes to Continue. The operator can reposition the sample to a better location, if desired
- Press Continue to start the measurement.
- A single point measurement is acquired from the standard.
- The user is presented with the results, including a Pass (‘OK’) or Fail (‘NOk’) based on the percentage difference between the expected and achieved X-ray count rate. The threshold percentage depends on the element weight percent composition of the standard.
- Either Abort or Accept the results.

The History button shows the results of previous Standard checks.
Related Article
ETU – Introduction
Reading Duration 2min
Why a complex instrument should use a complex interface ? Trying to address this question leads us to rethink all of our softwares to turn them really easy to use. We had to forget all the way we develop softwares since decades and from a white paper, we imagined a new design that can hold advanced functionality together with intuitive touch-screen control in a unique window.
Start With Tactis ETU Software
Reading Duration 6min
Tactis ETU Software is a part of PeakSight 6.3 and late.
ETU – Setup/Stage
Reading Duration 4min
This part describes the SETUP/STAGE tab
Optical Microscopy
Reading Duration 4min
This article presents, in a tutorial mode, how to display and acquire high-quality images from optical microscopy system of the SX-FIVE. Functions are spread into ’Optical microscopy’ (all the hardware controls), ‘Save’ and ‘Mosaic’ subsections.
Scanning Electron Microscopy
Reading Duration 11min
Electronic images are provide though the Scanning Electron Microscopy functionalities of the SX-FIVE. Three detectors are available.
ETU – XLive
Reading Duration 10min
X Live is a powerful tool designed to draw real time X images using WDS or EDS detection. Images can be acquired separately or as a composite including SEM image as background.
ETU – XImages
Reading Duration 5min
This tab is dedicated to the acquisition of high resolution / high count rate chemical maps.
ETU – Configuration – Menu
Reading Duration 10min
Configuration window allows to set ‘Focus Auto Config’, ‘Astigmatism Auto Config’, ‘Expert System Config’, ‘Check standard Config’ and ‘Check Machine Config’.
Contact

Our support team is ready to help you
FAQ

Answers to some common questions from SX users
Troubleshooting

Quickly search for solutions to instrument issues